


Got tubs of putty to mix? You have our original kit, which uses different steps.
Original kit instructions and return labelHow it works
Take your impressions at home.
About 20 minutes, start to finish. Heat, cool and press each tray, then mail them back to us.

Which kit do you have?
Check the trays in your box before you start.
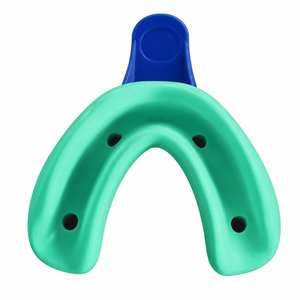
New kit
Putty already in the trays
You're in the right place. Follow the steps on this page.
Start with step 1
Original kit
Tubs of putty to mix
The steps on this page won't work for your kit. Use the original instructions, video and return label.
Original kit instructionsStep-by-step instructions
Tap a step to open it.
Get readyWhat you need, plus a quick fit check
In the box
- 2 pre-filled trays (top and bottom)
- Clear bag
- Return mailer
From home
- Pot deep enough to cover a tray
- Stove
- Tongs or slotted spoon
- Timer (your phone works)
- Stand-up mirror
- Table and chair
- Metal spoon, for remolding
Before you heat
- Brush your teeth.
- Take out piercings and removable dentures or plates.
- Try each tray on to make sure it covers every tooth. Too big or too small? Email us before you heat it, and we'll send a different size.
Take your impressionsHeat 1 min, cool 2 min, impress 3 min. Top tray first.
Careful with boiling water. Never leave the pot unattended, keep the water away from your skin, and always use tongs or a slotted spoon to move the tray.
-
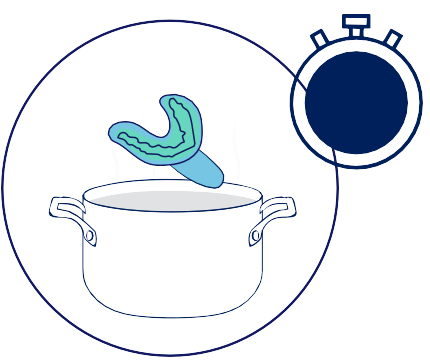
Step 1
Heat
Bring a pot of water to a rolling boil, with big bubbles across the whole surface. Place one tray in, putty side up and fully underwater, for 1 minute. Water from a kettle isn't hot enough.
-
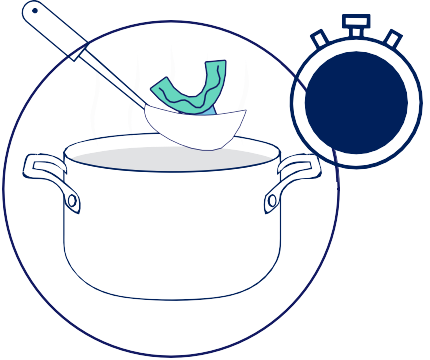
Step 2
Cool
Lift the tray out with tongs by the handle or base, not the putty. Let it cool for 2 minutes. It will be warm, but safe to put in your mouth.
-
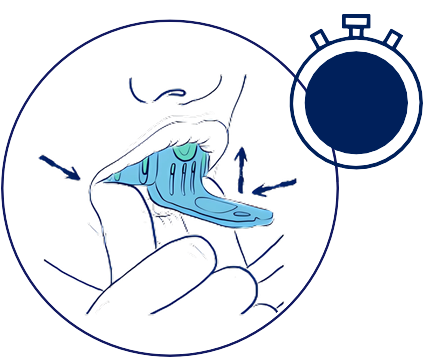
Step 3
Impress
Use your mirror to line your teeth up with the channel, then push the tray on in one smooth movement, as deep as it goes. Hold completely still for 3 minutes.
Then repeat with your bottom tray. We need both your top and bottom impressions to ensure the best fit.
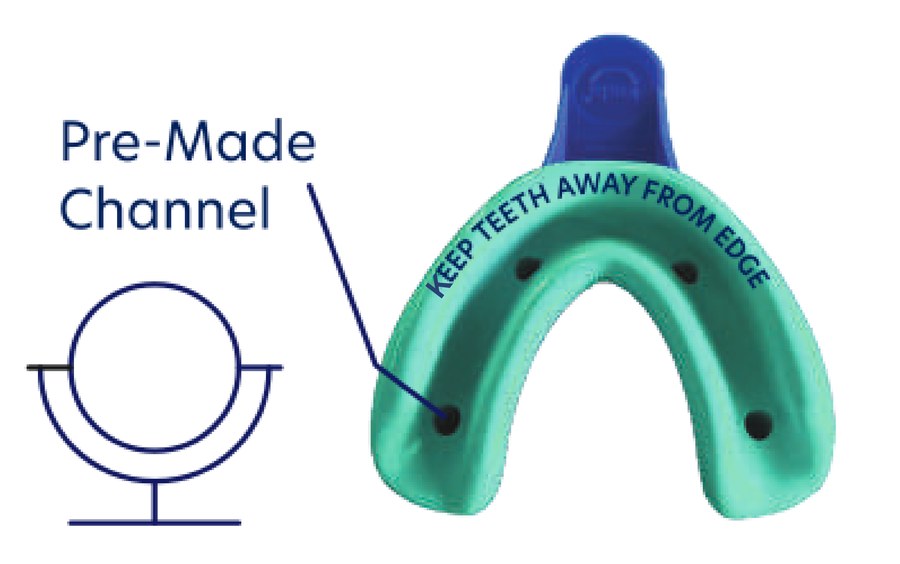
Line it up
- Keep your front teeth off the tray edge, with a small gap at the front
- Get every tooth, back teeth included, inside the channel
- Rest your elbows on the table and keep your lip outside the tray
Check themWhat a good impression looks like, and how to remold
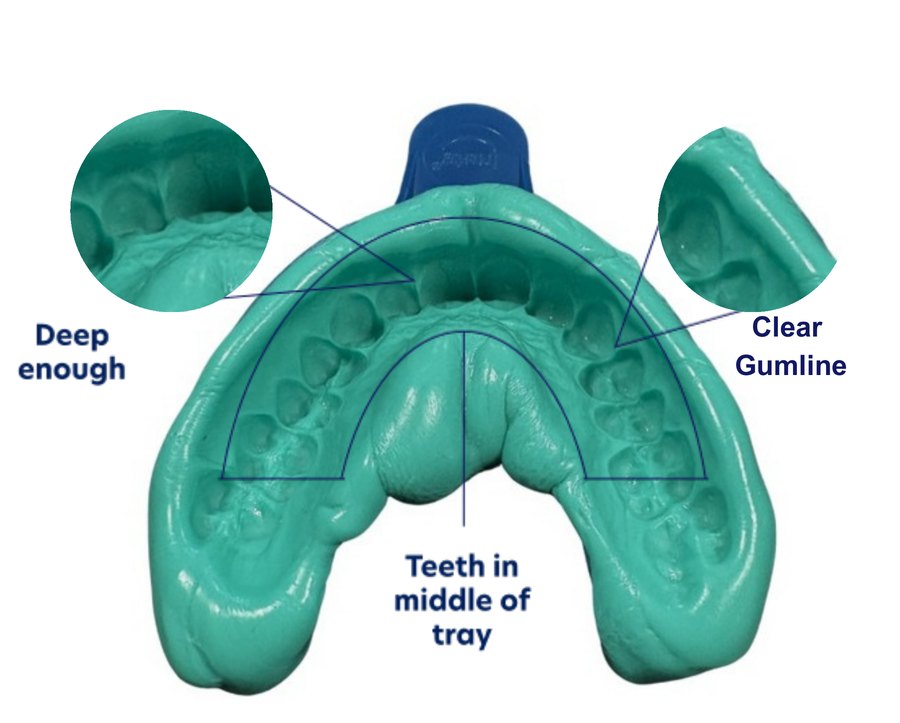
- Teeth centered, with a small gap at the front of the tray
- A clear gumline
- The full height of every tooth
- Back teeth fully included
- Deep, even marks across all your teeth
Not right? Just remold it.
The putty is reusable, so you can redo an impression in the same tray as many times as you need. No new kit required.
Watch the how-to video2:21- Cool the tray to room temperature. Cold running water speeds this up.
- Reboil for 3 minutes.
- Cool for 1 minute.
- Smooth out the old tooth marks with your thumbs or the back of a metal spoon, about 45 seconds.
- Retake right away and hold still for 3 minutes.
Send them backGet your return label, pack both trays and mail them back
Get your return label
Return shipping is prepaid. Choose where you bought your kit.
Bought on getcheeky.com
We emailed your label to you. Can't find it? Download it now with your order email and order number.
Bought at Amazon, Target or Walmart
Use the access code inside your kit or on the plastic wrapping.
Go to postage.getcheeky.comHow to pack them
- Let both impressions cool completely.
- Put both trays in the clear bag, with the putty still inside.
- Seal the bag in the return mailer and attach your return label.
- Drop it off at USPS. Please mail it within 60 days of getting your kit.
What happens next
- Within 48 hoursof your impressions arriving, we'll email you to let you know our lab has them.
- 7 to 14 business daysafter we receive your impressions, your guard ships. Busy periods can take a little longer.
- On file for next timeWe keep your approved impressions, so refills and plan changes don't need a new kit.
Every Cheeky guard is made in the same dental lab your dentist uses.
Can I take my impressions if I have braces or a permanent retainer?
Yes. You can take your impressions with braces or a permanent (bonded) retainer. Leave them in while you take your impressions.
Take out anything removable, like dentures, plates or a removable retainer, before you start. If you have other dental work you're not sure about, contact us before you begin and we'll help.
The putty feels too stiff. What should I do?
It needs a little more heat to soften fully. Remold the tray and adjust your timing:
- On a first impression: cool it for 30 seconds less (1 minute 30 seconds instead of 2 minutes).
- When remolding: reboil it for 30 seconds longer (3 minutes 30 seconds instead of 3 minutes).
The putty feels too hot. What should I do?
Take the tray out of your mouth. Remold it (see "Can I redo my impression?"), and this time let it cool 30 seconds longer before you put it in your mouth.
Does the water have to be boiling?
Yes. The water must be at a full rolling boil, with big bubbles breaking across the whole surface, for the entire minute the tray is in it. Make sure the tray is fully underwater.
A pot or pan on the stove is the easiest way to keep it boiling. Water that has stopped boiling, like water poured from a kettle, won't soften the putty enough.
The old tooth marks won't smooth out. What should I do?
The putty probably didn't soften enough. Reboil it for another 3 minutes and smooth it again. If the surface still isn't smooth, press it flat with the back of a metal spoon.
What happens if my impression can't be used?
No worries. If our lab can't use an impression, we'll reach out and send you a new impression kit free of charge.
A redo does add time to your order, so it's worth checking your impressions against the checklist before you mail them.
See all questionsShow fewer questions
Before you start
What's new about the Cheeky impression kit?
Your trays now come with the impression putty already inside, so there's nothing to mix. You warm each tray in boiling water, let it cool for a couple of minutes, then press it onto your teeth and hold still.
If an impression doesn't come out right, you can reheat the same tray and take it again, as many times as you need.
My kit came with putty I need to mix. Which instructions do I follow?
You have our original impression kit, which uses different steps from our new kit. Follow the instructions that came in your kit, or go to getcheeky.com/pages/impress-original for the original video, steps and return label.
We still need both a top and a bottom impression to make your guard.
What's in my impression kit?
Your kit includes:
- 1 top impression tray, medium size, with putty inside
- 1 bottom impression tray, medium size, with putty inside
- 1 clear bag for your finished impressions
- 1 return mailer to send them back to us
What do I need from home?
- A pot or pan with enough water to fully cover a tray
- A stove
- Tongs or a slotted spoon
- A timer or stopwatch (your phone works)
- A free-standing table mirror
- A desk or table with a chair, so you can rest your elbows
- A clean, hard surface
- A metal spoon (optional, helpful if you need to remold)
- About 20 minutes with no distractions
How long does it take?
About 20 minutes for both impressions. Read through the instructions and watch the how-to video once before you start, so you know what's coming. Timing matters, so have your timer ready.
Do I need to take both a top and a bottom impression?
Yes, please send both, even if you ordered only one guard.
We need both your top and bottom impressions to ensure the best fit. If we only get one, we'll need to send you a new kit, which delays your order.
Where can I watch the how-to video?
Watch the how-to video here. It's 2 minutes 21 seconds long.
We recommend watching it all the way through once before you begin.
How should I get ready?
- Brush your teeth so they're free of food and debris.
- Take out any lip, mouth or tongue piercings.
- Take out any removable dentures or plates.
- Fill your pot with enough water to fully cover a tray.
- Take the trays out of their plastic bags.
- Sit at a table where you can rest your elbows, with your mirror in front of you.
How do I know if the trays fit?
Your kit comes with medium trays, which fit most people. Before you heat anything, place each tray over your teeth to check the size. It should cover all of your teeth, back molars included, with a small gap between your front teeth and the front edge of the tray.
If the medium trays feel too small or too big, email customersupport@getcheeky.com and we'll send small or large trays right away. Please wait to heat your trays until you have the right size.
Taking your impressions
How do I take my impressions, step by step?
You'll repeat the same 3 steps for each tray: heat, cool, impress. Start with your top teeth.
- Heat (1 minute). Bring your water to a rolling boil, with big bubbles breaking across the whole surface. Place one tray in the water, putty side up and fully underwater, for exactly 1 minute.
- Cool (2 minutes). Lift the tray out with tongs or a slotted spoon, holding it by the handle or base. Don't touch the putty. Let it cool for exactly 2 minutes. It will be warm, but safe to put in your mouth.
- Impress (3 minutes). Using your mirror, line your teeth up with the channel in the putty and press the tray on in one smooth push, as deep as it will go. Hold completely still for 3 minutes, then remove the tray using the front handle.
Then repeat all 3 steps with your bottom tray.
How do I line up the tray correctly?
Use your mirror. Center your teeth over the channel in the putty so every tooth sits inside it.
Keep a small gap between your front teeth and the front edge of the tray. If your front teeth touch the front of the tray, your impression will likely need to be redone. Keep your lip on the outside of the tray.
How hard should I press?
Firmly. Push the tray on in one continuous movement, as deep as it will go, so the putty captures the full height of every tooth. Push evenly on both sides.
- Top tray: place your thumbs under the tray, below your canine (fang) teeth, and push up.
- Bottom tray: place your pointer fingers on the tray and push down.
Rest your elbows on the table to keep the pressure steady.
How long do I hold the tray in my mouth?
3 minutes, without moving. Keep your elbows on the table and stay relaxed. Any movement can distort the impression.
Don't take the tray out early. The putty needs the full 3 minutes to set.
How do I take the tray out?
After 3 minutes, hold the front handle and gently pull the tray off your teeth. Leave the putty in the tray.
Should I take the putty out of the tray?
No. The putty stays in the tray the whole time: while you take your impression, if you remold it, and when you mail it back.
Is this safe to do at home?
Yes, as long as you're careful with the boiling water. Never leave the pot unattended, keep the water away from your skin, and always use tongs or a slotted spoon to move the tray.
After the 2-minute cool, the tray will be warm but safe to put in your mouth. If it ever feels too hot, take it out and let it cool longer.
Checking and redoing
How do I know if my impression is good?
Before you send your impressions back, check each one for:
- Teeth centered in the tray
- A clear gumline you can see
- The full height of every tooth
- Your back molars fully included
- Deep, even marks across all of your teeth
- A tray that was held still for the full 3 minutes
Compare yours to the example photos in your instructions.
What are the most common mistakes?
Most impressions that need a redo come down to one of these:
- Front teeth touching the front of the tray
- Not pressing deep enough
- Moving during the 3-minute hold
- Missing the back molars
- Taking the tray out too early
Take your time. Careful placement means faster approval.
Can I redo my impression?
Yes. The putty is reusable, so you can remold and retake an impression as many times as you need.
- Cool the tray to room temperature. Let it sit, or run cold water over it to speed things up.
- Reboil for 3 minutes. This fully softens the putty.
- Cool for 1 minute. It will be warm but safe to handle.
- Smooth the putty for about 45 seconds. Use your thumbs to press out all of the old tooth marks, right in the tray. The back of a metal spoon helps flatten it, and you can use the spoon to press a clean channel down the center. It should look as close to new as possible.
- Retake right away. Put the tray in your mouth immediately and hold still for 3 minutes, just like the first time.
Keep the putty in the tray the whole time.
Sending them back
How do I send my impressions back?
- Let both impressions cool completely.
- Put both trays, with the putty still in them, in the clear bag.
- Put the bag in the return mailer.
- Attach your prepaid return label to the mailer. See Get your return label above.
- Drop it off at USPS.
Where do I get my return label?
If you ordered on getcheeky.com, we emailed your label to you. Can't find it? Use Download your label above with your order email and order number.
If you bought your kit at Amazon, Target or Walmart, use the access code inside your kit at postage.getcheeky.com.
If you have any trouble, email customersupport@getcheeky.com and we'll email you a label right away.
Do I have to pay for return shipping?
No. Your return label is prepaid.
How soon do I need to mail my impressions back?
As soon as you can. The sooner we have them, the sooner your guard ships. Please mail them back within 60 days of receiving your kit.
How will I know you received my impressions?
Once our lab receives and processes your impressions, we'll email you. Please allow up to 48 hours after they arrive for that email.
When will I get my night guard?
We ship your guard within 7 to 14 business days of receiving your impressions. Busy periods can occasionally take a little longer.
Will I need to take new impressions for my next guard?
No. Once your impressions are approved, we keep them on file, so refills and plan changes don't need a new kit.
Who do I contact if I have questions?
Email customersupport@getcheeky.com or message us at getcheeky.com.
Still have questions?
Email customersupport@getcheeky.com or send us a message, and we'll help you out.


